Swordfish-like Steak with Crispy Capers by Alison Roman

I made this dish — well, actually my brother mostly made this dish — using a .4 lb. swordfish steak, which we split between 6 people. I’m at the point where I’ve eaten more seafood in one year than I have in my entire lifetime, so I was not about to buy 16 oz. of swordfish. 

Swordfish itself is rather dense, on the drier side, and dons a distinctly fishy taste. It’s not a personal favorite. Neither is it a favorite of my family members, who generally stay away from anything fishy and stick to the occasional salmon filet once or twice a year. (We’re from coastal Orange County and we still don’t have a pallet for seafood!) But somehow, each family member enjoyed their bite of this fish. I think, because it was dominated by salty, buttery, and briny flavors. The fishiness hit last. 

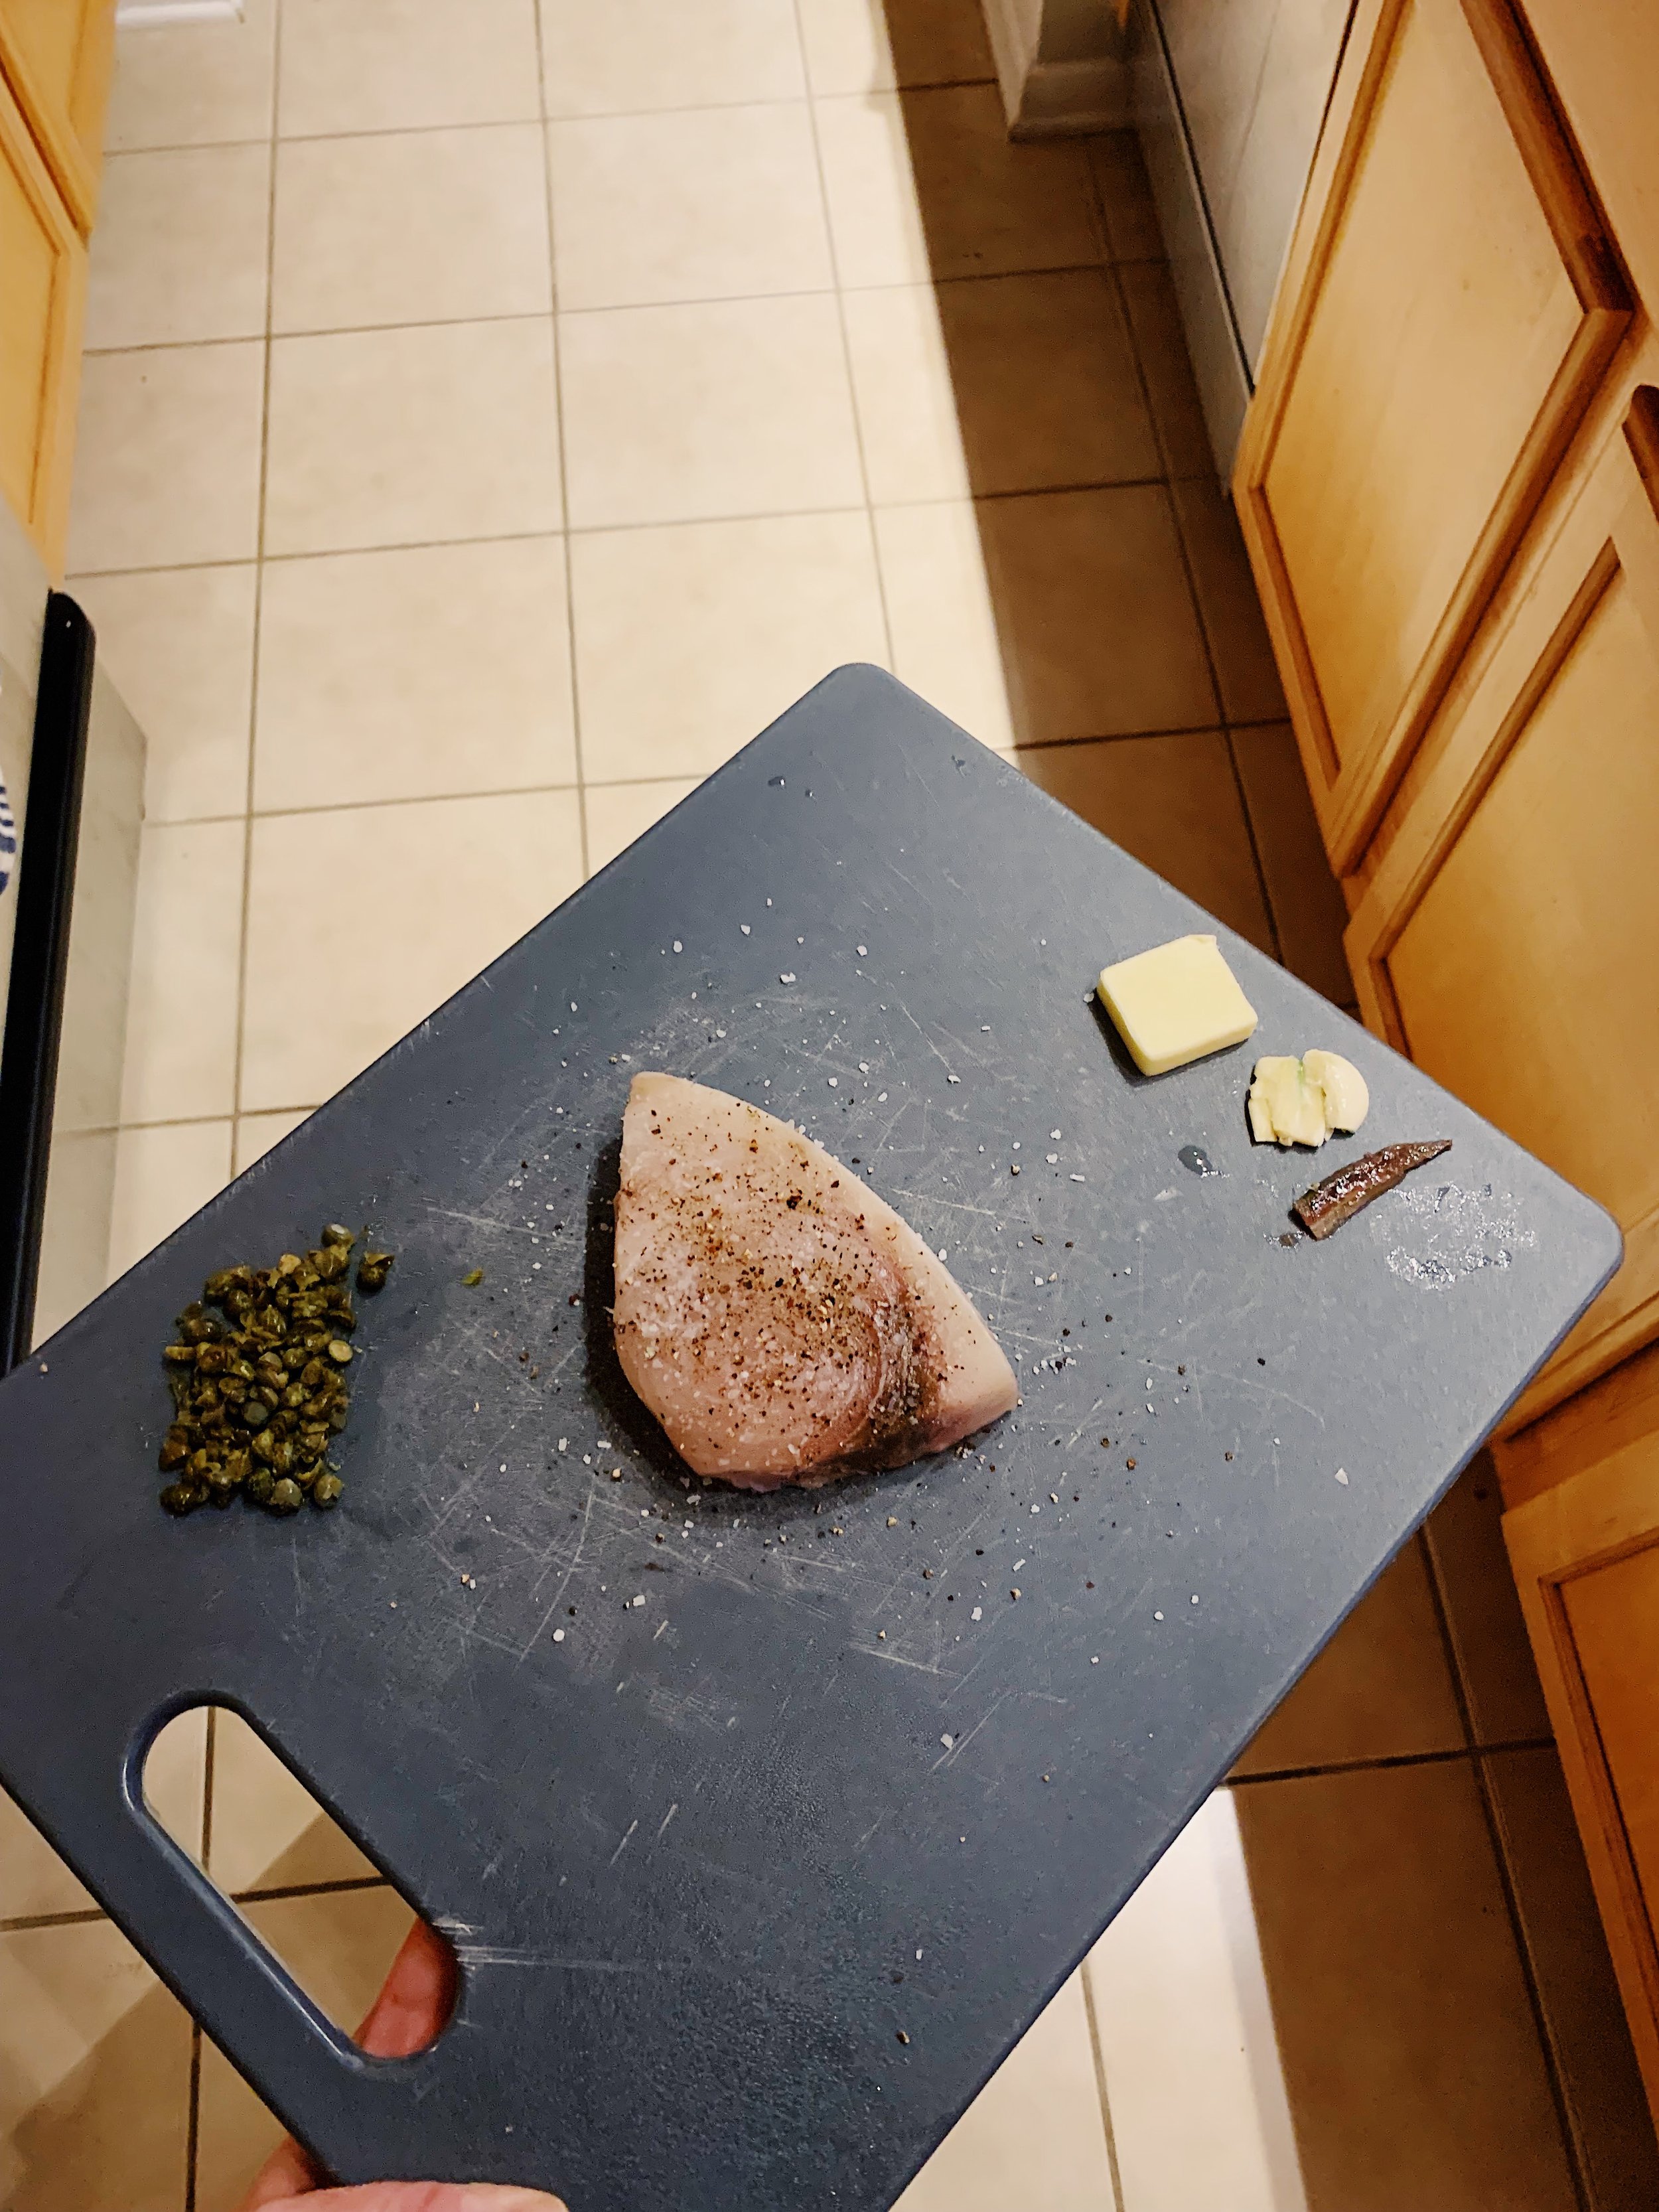
The assembly is rather simple. Season the swordfish with salt and pepper, and sear it in a skillet until golden brown on each side. Then add butter, a smashed garlic clove, an anchovy, and chopped capers. Let the butter melt, then use it to baste the fish, scooping it up and over the steak for several minutes. The whole process takes about 12 minutes. 

The fish was like a salty umami bomb. I’d recommend forgoing the anchovy in this case. It seemed to be what put the fish over the edge in the salt category. Everyone enjoyed their one bite, remarking that that was all they needed to enjoy the fish. 

215 recipes cooked, 10 to go.

Pizza Night by Alison Roman

Gosh, I love pizza. And this was really good pizza. I saved this recipe for the end of the project, knowing I’d need something to look forward to amidst all the seafood. 

The dough is made using Alison’s Overnight Focaccia, Tonight recipe. I wrote a funky stream-of-consciousness essay about that focaccia here. The dough is proved and ready for baking within about 3 hours of starting the recipe. So, hoping to eat at 6:00pm, I started the dough at 3:00pm. 

While the dough rose, I made Alison’s simple tomato sauce. And I’ll admit, it seemed almost too simple. A few smashed garlic cloves, a can of tomatoes, salt and pepper. I don’t want to make tomato sauce complicated, but would this have enough flavor? The answer is most certainly, yes. She’s not specific about salt amounts, so I used 1 tsp., in keeping with the fairly simple tomato sauce recipe I love from Julia Turshen’s “Small Victories.” The sauce needs only a half hour or so to thicken up a bit and let the garlic infuse the tomatoes. I didn’t have whole peeled tomatoes on hand, just diced. Once the tomatoes were warmed through, I crushed them against the side of the pot with the back of a wooden spoon to achieve a similar texture and consistency. 

I love how simple, yet effective Alison’s topping suggestions are. Little is required to prep them beyond slicing a red onion and tearing up pieces of kale. She leaves all the work for the assembly, which is the most fun part any way. This recipe creates two pizzas, however I wanted to cook them one at a time. Stacking two baking sheets in my oven makes everything take longer and cook more imprecisely. To stagger the pizzas, I separated the dough in two after the second rise and put half in the fridge, covered in saran wrap. I let the first dough prove on a baking sheet, then topped it for baking about 35 minutes later. 

The first pizza was Alison’s Pepperoni Pie, and I followed it to a tee: tomato sauce, mozzarella, pepperoni, red onion, olive oil drizzled over the crust, then sprinkled with flaky salt. The instructions say to bake for 30 to 35 minutes. I removed my pie in 30 minutes, and found that the crust got a little overbaked. It was rather tough to bite into. I course-corrected the second pie and took it out in 27 minutes. The crust was comparatively easier to chew, but still achieved that toasty, golden look. 

While the pepperoni pie baked in the oven, I let the second dough prove on a sheet pan for the other pizza: Lemony Greens Pie. Jordan and I are big “meat on my pizza” people, so I was shocked to hear that both he and one of our dinner guests preferred this pizza over the pepperoni pie. I was worried that this pie wouldn’t have much going for it, flavor-wise, but I was wrong. 

I followed Alison’s topping list again: whole milk ricotta, topped with torn kale massaged in olive oil, grated parmesan, red onion, olive oil drizzled over the crust, then sprinkled with flaky salt. I also added red pepper flakes for a touch of heat. After the pizza came out of the oven, I topped it with parsley and lemon juice, plus a few finely chopped anchovies. The kale comes out partially crisped, and the parmesan becomes sort of crunchy and golden. Lemon juice really unites the ingredients and makes them taste brighter. 

I served the pizzas with Alison’s Crushed Peas and Burrata Salad (a great combo!), and her Coconut Banana Cream Pudding (post to come). 

This recipe has inspired me to get more creative and adventurous with my pizzas. Homemade pizza using store-bought dough is a common meal in our home, and I tend to use the same topping combinations each time. I’m excited to start using more variations per Alison’s list of toppings and improvise with what I have on hand. For example, I recently purchased a bag of nutritional yeast that I should try sprinkling on top of my next pizza. I doubt I’ll make her dough many more times, as I don’t love the way the crust turned out more crunchy than chewy. I think the Whole Foods brand of pizza dough cooks perfectly and takes far less effort. But that dough, topped with Alison’s topping combos? Now that’s a pizza night I look forward to.  

203 recipes cooked, 22 to go.

A Better Garlic Bread by Alison Roman

I’ve eaten a lot of garlic bread in my life. I enjoy it, but it doesn’t make or break a meal for me. I can’t remember a great garlic bread or a bad garlic bread I’ve had. Garlic bread is ancillary to me. 

Which is probably why I waited so long to make this recipe. Any time I meal-planned, I honestly forgot it was there. (I know this might sound odd given how much some people love garlic bread. I truly don’t know why I’m so ambivalent.) 

Garlic bread is an old staple. And I mean old. According to good ole Wikipedia, its origins can be traced back to Ancient Rome! It’s traditionally a combination of garlic, butter and/or olive oil, and toasted bread. Simple. So what makes Alison’s garlic bread better? Caramelized, confit garlic and anchovies. 

I peeled an entire head of garlic, and sizzled the cloves in a small bath of olive oil. The key is not to let the oil get so hot that the garlic burns, but hot enough to soften the garlic and turn it slightly brown. Once the garlic is ready, about 20 minutes, you’re ready to smash it with anchovies, softened butter and the garlicky olive oil. Spread the umami-filled mixture all over the sliced ciabatta and stick ‘em in the oven for 15 minutes at 425. I could have left mine in longer to get an even toastier bread, but our roast chicken was threatening to go cold, and I couldn’t stand simply smelling the bread any longer. I had to see if it was truly better than other garlic bread. 

It was pretty good. I mean, given my ambivalence about garlic bread, I can’t claim it changed my life. But the flavor was definitively garlicky without overpowering. The anchovies got rid of any bitterness from the garlic. The bread was still soft enough to sop up juices but toasted enough to hold structure. We topped the bread with the buttered tomatoes from Alison’s Slow-Roasted Oregano Chicken. I love that chicken recipe, so it’s a high compliment when I say that I’ll likely start serving this bread with it every time I make it in the future. The best way I can say it is, it really is a *better* garlic bread.

188 recipes cooked, 37 to go.

Just-Cooked Cabbage with Anchovy and Lemon by Alison Roman

Every Monday morning, I lead a quick check-in meeting with my team at work. We all stand up in the conference room and say something about our weekend. Then we each share one thing we need to accomplish that week. A pseudo-scrum meeting, if you will. This week, as I sat on the train to work, I considered what question I’d ask the team to answer about their weekend. I landed on “tell us one yummy thing you ate or drank” and “tell us a color that best represents your weekend.” 

We went around the table and people shared about gimlets, chocolate tortes, and pizza. When it was my turn, I said the best thing I ate was a seared cabbage with anchovies and lemon. Everyone stared. A what? I went on to explain this recipe and what made it so tasty, but they remained largely skeptical. And I don’t blame them. 

This is one of those recipes I didn’t look forward to making and put it off to the end. I can tolerate cabbage when it’s mixed with other things (soup), or when it’s fermented (kimchi, sauerkraut). But a regular, cooked cabbage? That did not sound appetizing. It seems that Alison knew it was a stretch, too. She said this recipe barely made it in the book, but at the final hour, she decided it was too good to exclude. I think she knew just-cooked cabbage could be a hard sell for many cooks. 

I chose to cook a small, sweet cabbage, knowing Jordan and I couldn’t finish off an entire large bulb on our own. I quartered the cabbage and seared it in my cast iron skillet, roughly 6 minutes per side on medium-high heat. Alison says to salt and pepper the cabbage beforehand, but the salt just rolled right off onto the cutting board. I recommend waiting until it's cooked to season it. I melted the butter until foamy and slightly browned, then added the anchovies and let them shrink into tiny bits. I poured the buttery, salty liquid over the cabbage, squeezed half a lemon over the plate, and added flaky sea salt. 

I guess it’s hard to dislike melted butter with anchovies, no matter what you drizzle it over. Even a softened cabbage. And the lemon really takes it to another level. 

187 recipes cooked, 38 to go.

Low and Slow Rib Roast with Rosemary and Anchovy by Alison Roman

I’ll just come right out and say that this 4.7 lb. hunk of beef is one of my greatest achievements in the kitchen to date. Attaining the perfect internal temperature and color of a large piece of meat has never been a strong suit of mine. Whether it’s an oven that’s unpredictable or my own issues with patience or judgment of done-ness, I’ve tended to overcook meat. 

This year, I committed myself to growing my meat skills. An obvious step one? Buy a reliable digital meat thermometer. Yes, I’ve been rightly accused of slicing open a chicken breast multiple times before it’s done to look for “pinkness.” My meat thermometer has saved me many premature hackings of quality protein. Second step, buy an oven thermometer. Ovens, especially old ones, lie. I’ve yet to live in an apartment where the oven temperature is exactly as listed. 

Third step, trial and error. Though I haven’t failed spectacularly, I’ve been willing to. It’s the willingness that makes all the difference. Alison isn’t afraid of big cuts of meat, and her recipes have given me the chance to stretch my wings. Of them all, two recipes seemed most daunting to me, this rib roast, and her yogurt-marinated leg of lamb which supposedly feeds 8-10 people (that will happen soon). So you could say I was nervous.

A rib roast is intimidating, first of all, because it’s expensive. The cost of failure was a third of my entire grocery bill. Second, though active involvement is quite low, the recipe requires a lot of choices to be made by the cook, which feels risky. So I asked myself, when’s the last time you did something you’re proud of that didn’t require risk? *crickets*.....  Let’s dive in. 

I salted the roast, then made my first big decision to let it sit at room temperature for two and a half hours (instead of in the fridge for far longer). I guess that wasn’t so hard? Meanwhile, I prepped the marinade: chopped anchovy, rosemary, and grated garlic with salt and olive oil. Here, I’d recommend the more marinade the better. With such a large roast, it’s hard to overdo it with flavor. 

With a good bit of oven temperature monitoring, the roast cooked for two hours and five minutes at 250 degrees. Alison gives a range of time here, so I chose to check it on the early side - and what do you know, it was ready to go! The internal temp you’re looking for is 110 degrees, and Alison says it should rise to 125 by the time you’re ready to sear/or flash-roast it (my term for roasting briefly at a high temp). Again, much to my delight, the meat rose to 125 degrees exactly while I heated the oven to 500 degrees. (Is it weird that I’m delighted by instructions coming true? It so rarely seems to work out this well.)

I made my third and fourth choices -- due to the time of day, I chose not to let the roast sit at room temperature for up to four hours, but only for twenty minutes as the oven temp rose. Then I chose to brown the fat by flash-roasting, instead of searing. Why? Clean up. Imagine the fatty oil splattering every surface of my kitchen if I seared the meat in a skillet. Nope. Not today. 

After just 10 minutes, the fat was properly browned and the anchovy bits appeared well-crisped. (And my floor remained without oil spills.) I sliced the meat with bated breath… 

And it looked perfect. It even tasted perfect - melt-in-your-mouth tender. As I said, this rib roast is one of my crowning achievements in this project, due to a convergence of careful attention, following instructions, and definitely luck. I served it with leftover Thanksgiving mashed potatoes and Alison’s Little Gems and Cabbage salad (also phenomenal, post to come). 

Friends, if this recipe also intimidated you when reading through nothing fancy, let this be your encouragement to give it a go. If you pay attention, follow her advice, and maybe say a few quick prayers, this recipe could become one of your proudest meals, too. 

176 recipes cooked, 49 to go.